DV Camera Quick Start by B.T. Corwin
For a PDF copy click here.
It’s been said that it only takes five minutes to learn how to turn a camera on and off, but it takes five years to learn what to point it at. We don’t have five years, so I’ll be leaving some things out. What I hope you’ll take away with you is enough of the necessities to go out and shoot video that can be edited. After that, it’s practice practice practice.
Let’s get started.
Here’s what you should have with you:
Your DV camcorder
A tripod
A fresh battery, preferable a long life one, or your AC adaptor (but you won’t be able to move around much)
At least one DV tape
Optional: An external microphone, a reflector, three lights and stands
Since good video usually means holding the camera as steady as possible, this is a good time to mount the camcorder onto the tripod.*
*As camcorders have gotten smaller and lighter, they are actually harder to hold steady. The “handycam” models are the most difficult since you don’t rest the bulk of the camera on your shoulder and brace your arms. A tripod is the answer. Plan on shooting as much of your video on a tripod as possible. And, if you can’t use an actual tripod, look around for a natural substitute, like a table, the ground, or a tree. Rock solid steady is what you want.
There are a few things that you need to do with your new (or old) DV camera before you can start to shoot. This is true no matter what make or model camcorder you have.
- First, you need to go into the menu and make sure that the Time and Date have been set. They don’t need to be accurate, they just need to be set.
- Next, find the menu for Audio, and set it for 16-bit/48kHz, not 12-bit/32kHz
- And finally, turn off the digital zoom.
Now, check that you have charged batteries and enough tape stock.*
*I recommend that you black each of your new tapes before taking them out to shoot. This is a simple procedure – you just set your camcorder to VCR mode, put in the tape, and push the Record button. Let it record the entire tape this way until the end, then rewind it. What you are doing is creating a control track with timecode onto the tape. It is necessary to have continuous, unbroken timecode when you transfer your video into the computer. (I’m assuming you are using a consumer camcorder. If you are using a professional camera with addressable timecode, this step is not necessary.)
Let’s go thru some of the features that your camcorder probably has, and why you won’t be using many of them.
First of all, you can just completely ignore all the controls for fades, posterizing and other editing features. You’ll be doing these things when you use Final Cut Pro or iMovie*.
*The only exception is if you are shooting a movie entirely in Black and White or some other effect that will be applied to the whole movie. To save rendering time, it’s ok to let the camera record the video in that mode. But, if you change your mind later, you won’t be able to remove it. When in doubt, let the software add the effects.
Your camera is probably set to Auto mode. This means that the camera will automatically set the shutter speed, the exposure and the focus for you. Some cameras will automatically sense the light color temperature called White Balancing. You will be doing this semi-manually, so get out your manual and look at the camera body and see where these controls are. Turn auto mode off for now. You will be turning these features on and off a lot, so get comfortable doing it.
Another highly promoted feature of most camcorders is the zoom. You won’t be using this very much either. One of my mentors told me that you aren’t given a zoom, you must earn it!
To focus your camcorder, you’ll need to know how to change from auto focus to manual focus. Practice turning the auto focus off and then back on. Once you’ve got that figured out, continue.
Here’s where it’s OK to use the zoom:
With the camcorder on auto focus, zoom into an object or your subject as far as your camera can go and let the camera auto set the focus. Now, change it to manual focus and zoom back out to your desired framing. If you are shooting a person, zoom into their eyes.
As long as you don’t change the distance between you and the objects you are shooting, your focus will be set. This avoids the very common problem of the camera “hunting” for focus during a scene. A big no-no.
You will use the same technique for the aperture, though it might need a little more modification. Zoom in until most of what you are shooting fills the frame – not as much as for the focus – then let the auto function set the exposure. Switch it to manual and zoom out to your desired framing. Getting the exposure set correctly is often a compromise. Unless you have complete control of the lighting, one area of the picture is usually lighter or darker than others. You have to set the exposure for the most important part of the picture, and if something in the background is too dark or too light, you have to live with it – or manipulate the lighting to be more even.*
*Some camcorders have a setting for “Backlight.” This is when too much light is coming from behind the subject and the auto exposure makes their face too dark. Switching this on can help, but if you zoom into the subject enough to eliminate most of the too bright background, set the exposure and then take it off auto before you zoom out to your final framing, you will get a similar result.
Before we get farther into the mechanics of taking video, let’s talk a little about what to shoot. Remember, the goal here is for you to bring back highly edit-able video your first time out.
Let’s talk about what a shot should look like. Here are names for the most common ones: The wide shot, the medium shot, the tight shot, the very tight shot. There are also variations; the close-up, the very big close-up, the bust shot, etc.
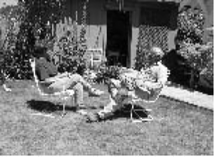
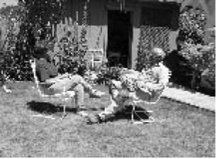
This is an interview wide shot
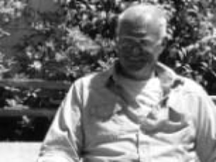
This is a Medium shot

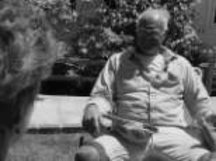
This is the tight shot

This is the very tight shot
How long should you hold a shot? The absolute minimum is five seconds and the maximum is no more than 15 seconds, but these times are for the edited shot, not how long you record it.
When do you start counting the seconds? As soon as the camera is completely still – that means it’s focused, the shot is framed, and you don’t have your finger on the zoom control. If you are planning to do a pan, you still want to count to five before starting the pan, which should take not more than five seconds to complete. You should then hold the camera on the last framing for five additional seconds and then reverse pan the camera back to where you started. This will give the editor (maybe you) at least four different shots to work with. The same is true whether you are panning left and right or tilting up and down. Always make it a habit to start on a static shot, end on a static shot, and reverse the move. You also want to make sure that you start on something specific and the move goes to something else. You don’t want to be seemingly aimlessly panning the camera around.
*Practice framing a shot on something and counting to five then panning left to something else, count to five, then pan right back to your original shot and count to five. Try to do this several times, adjusting the speed of your pans so that you can do the move smoothly at the speed you want.
Why should you avoid using the zoom button? Because of the lack of control over the speed. Inexpensive camcorders have only two speeds. Slowish, and medium. They don’t have the ability to creep, so you can’t ease a zoom in and out. If you pay attention to almost any film, you won’t see many zooms, though you might see some dolly or tracking shots. Most films are shot with fixed lenses on the cameras. When the director wants to change the focal length (zoom), the camera operator puts a different lens on the camera, or the camera is moved..*
*There’s another important reason why you don\’t see many zooms in films and it has to do with depth of field. As you change the focal length of the lens through zooming you are changing the depth of field. That means that objects in the background get more out of focus or in sharper focus. Directors don’t want this change as they cut back and forth from WS to TS.
You’re almost ready to go out and start shooting, just a little more theory before you head out the door.
When you take pictures, you are showing a particular point of view. In order to keep the illusion you must make sure that all your shots retain that point of view. So, if a person is looking left in one shot, they must continue to look left. If you are following a person on a bicycle, the direction must always be the same, otherwise it will look as though they are going back to where they started. If you break this rule, you have Crossed the Line.

Jeanna is looking Screen Right
Ken is looking Screen Left

A slightly tighter shot of Ken still looking Screen Left

Jeanna is looking the wrong way!
Just imagine a circle around your scene. Divide the circle in half. Which half are you in? Whichever it is, stay on that side. Of course if you are trying to show two different viewpoints, then by all means, Cross the Line!
Another very important shot is the cutaway. This is the shot an editor uses to cover a jump in time. Let’s say you are doing an interview. The person talks for about five minutes, but you only want to use one clip in the beginning that’s about 10 seconds long, and then later in the interview another little clip thats another 15 seconds long. If you put the two clips together, you will see a little jump at the edit point. That tells your audience that you cut something out. Movies and TV like to hide the jump to keep up the illusion of a continuous story. Hence, the invention of the cutaway. That’s a shot that is not connected visually to anything in the two shots you are putting together, but has some meaning to your story. In news and documentaries, the classic cutaway shot is called the reverse or noddy. That’s when you see the reporter looking at the subject and looking really interested. In an action sequence, like a basketball game, the cutaway is often a shot of the clock counting down, the scoreboard, the crowd, the cheerleaders, the players on the bench, you get the idea.
Now that you’re thinking of what shots you’ll need, let’s go over them.
Usually the first shot you get is the wide shot, or establisher. It’s good to get it first, just in case things change. Ideally, you’ll shoot two or three different WS, so you have a choice of which to use. Next would be the assortment of shots needed to cover the event or scene. If you are shooting documentary style, which is not directing the action, you’ll need to shoot at least one WS (wide shot) and several cutaways. You’ll also need to get reverse angles on any sequences that are depicted, and TS (tight shots) if there are any objects. If you are directing a scene, you’ll probably want to do it over at least three times. Once for the WS (sometimes called the Master shot in film), then twice more from two different angles showing the same scene. As the editor you will mix these shots together taking a little from one, a bit from another, and maybe using the third angle as well. When shooting these second and third takes you’ll also want to try to change the framing, so the shots look different.


Speaking of framing, this is a good time to think about picture composition. Again, there are some rules to help you get started. Imagine the frame is divided into thirds.


See the box in the dead center? That’s not where you want to frame your subjects.


Instead, try to put them a little off to the right or left, where the lines intersect. This is sometimes called Nose Room. The side with the extra space is the side they are facing towards. You don’t want to go so far over to be totally in the right or left part of the screen. This is true whether you are shooting an interview or shooting a person making a speech on a podium. Move your camera position so that you are just a little off of center to avoid having the person facing directly at the camera.*
The exception here is the TV Anchor newsdesk, or the President. In this case, the person does face directly opposite the camera and looks right into the lens.
OK, so the person is framed nicely offset, now look at the amount of headroom you have. The top of the person’s head should be near the top of the frame. Not too much sky above, but don’t cut off too much hair, unless it’s a fluffy hairstyle that sticks way up. Where you cut the shot off below is based on what kind of shot you want, WS, MS, or TS. Try to avoid cutting at actual joints, like shoulders, hips or knees, instead go a little above or below. Now you know why it’s called a Bust Shot!
The exception to this is when you are shooting a person extremely tight, a la 60 Minutes. Then you cut them off at the forehead and just below the chin.

Now would be a good time to practice framing some MS and TS of someone’s face as if during an interview. As you frame the shot, check to see that you have them offset a little to the left or right, you are zoomed in or out to show the correct headroom, and you are cutting the shot off at a spot that doesn’t look painful.
Now that you understand the basic shots, let’s add another layer of complexity. Your movie will be made up of a number of sequences strung together to tell your story. Each of these sequences will be made up of one or more shots. So, try not to frame each WS or each reverse shot or each cutaway for your sequences exactly the same.
As an example, let’s look a how you shoot a process, in this case a person making a sandwich. You can start on the person and follow them to the refrigerator and continue to follow him as he open the refrigerator, takes out the mayo, peanut butter, lettuce etc. and then follow him as he lays it out on the countertop, continue to follow as he walks over to get the bread, takes out two slices, walks over to the toaster and puts the slices in. Then walks back over to the counter to wash the lettuce, etc. It might take five minutes to do all these things. If you need to cut this down to 30 seconds, you will have problems. The person is in all the shots, so you can’t cut anything out without creating a jump cut that you don’t have any video to cover. How would you shoot the same process, but in a way that it can be edited down to take 30 seconds? I’ll start you off with some typical shots and then you think up your own. There’s no exact right way to do it, so as long as you are mixing your shot framing and allowing the action to come into and go out of scenes, you will be able to edit the material.
Start with a WS framed on the refrigerator door and the person walks into the shot and opens the door.
Stop the person, and reset to a side angle and frame a MS with the person’s face and torso.
Back them up a few steps and then let the person walk into the frame and open the door.
Stop them again, and with the refrigerator door open, frame a shot of the lettuce or mayo. Let the hand come into the shot and take the ingredients out of the shot.
Frame the countertop, empty, and let the mayo jar and lettuce come into the shot.
Shoot a TS of the person’s face as they look down.
Shoot a TS of the loaf of bread, let the hands come into the shot, pick up the bread and go out of the shot.
I think you’re getting the idea here, so continue shooting the process, changing the angles, the framing, and let things come into and go out of the frame. Try to keep in mind how these shots will be pieced together to create what looks like a seamless event. Do the best you can, but don’t worry too much about not getting everything right. Once you bring the footage into your editing program and start to work with it, it will be easier to see what works and what doesn’t. Every time you shoot something a part of your brain must be thinking about how this particular shot can be used and you have to adjust accordingly. Many expert shooters can visualize the entire edited piece in their heads as they shoot it, including the soundbites!
Now, by now you’re probably thinking, this is a lot to think about while I’m trying to shoot. You’ve got to keep in mind where the light is coming from, is the exposure set correctly, the white balance correct, am I in focus and if I do a camera move will it stay in focus, and where are the actors going move to next; is someone going to be saying something dramatic that I should get, and how many WS, MS, TS did I get and did I get enough cutaways? And, will those cutaways work?
Well, that’s why it takes time to get really good at it. The more you practice handling the camera, the less you have to think about how to focus it, set the aperture, etc. and the more your brain can concentrate on the aesthetics and content of what you are shooting.
Let’s now turn to the sound. Sound is actually 50% of the picture, so just letting the camcorder capture what it can from the built-in mic isn’t good enough. There are of course several different ways to get better sound. Like all of filmmaking, it’s a question of budget. More money, better equipment, more people equals better results. Let’s hope you have enough of a budget to afford an external mic, either hardwired or better yet, wireless. An acceptable industrial quality wireless mic can be bought for under $200; and a hardwired mic and cable is a little less. Of course you can also spend thousands, but we’ll explore the low end.
Have you got another person? Then you have a soundman and you can use a boom mic or fishpole. If you can’t afford an actual boom pole, there are cheap substitutes. Be creative. Visit a Home Depot. (Look at the extendable aluminum poles used for washing RVs!) In a pinch, you can always use a broom stick. The boomed mic is usually held above the actors heads, out of the shot. If the camera is low and shooting upwards, then the boom operator swings the boom down, and holds it under. Try not to clobber anyone.
If you don’t have another person, you can still get good audio by using either a wired or wireless lavaliere mic. This is a very small mic, about the size of a pencil eraser, that clips onto a tie-tack type of holder and connects to the external mic input of most camcorders. Or, you can attach a directional mic, sometimes called a shotgun mic, to the top of your camcorder. If you do, you’ll have to stay fairly close to the person talking.
*If you are shooting a scene that has continuous sound, like music, and you are not able to have the music replayed for you, then don’t turn the camera off, just let it record even when you are moving the camera position, focusing, etc. By having a continuous recording of the audio you will be able to edit the sound later, using one continuous piece for the whole scene.
Lighting is an art unto itself, but there are some rules and tricks that can help you get decent results without spending thousands of dollars on lights or hiring a DP (director of photography). The most common term associated with lighting is called 3 point lighting. What this means is that 3 light sources are used. The first is the main source of illumination and it’s called the key light. The 2nd is called the fill light, and the 3rd point is the backlight. There’s often a fourth just for the background. In a typical interview setting here's how you light it. First, look around and decide what background you want to see. The camera only sees about 25 degrees, so if you see a small area that looks nice, put the chair in front of it. Try to keep the chair as far away from the background as possible, hopefully at least three feet. Now position the camera. Put the camera about six to 10 feet away from the subject, if at all possible. Have a stand-in sit in the chair and take a look through the viewfinder or monitor to frame your shot. Most interviews are shot with a MS (medium shot, or bust shot), a TS, and at least one WS at the beginning or end. You can use your zoom control to test the different shots. Move the camera a little bit to the left and then to the right and also raise it up and lower it, until you like the way the person’s head is framed with the background. Now it’s time to light. First of all, which side is the “reporter” sitting? This is the side your key light goes. Place the light high up enough so that the subject isn’t looking into a light when they look at your interviewer (the reporter). Now, using either barn doors, or blackwrap, or clipping flags, cut off all the light except the bit that shines on the person’s face. It’s probably very harsh so you’ll need to reduce it by moving it farther away – which makes it weaker, or you can add diffusion to the front. If you can afford softlights, I highly recommend them, but you can achieve perfectly acceptable results without them. Next you can set your fill light. This can be an actual light, or can be a reflective board. Many people use a white foam board to fill, or one of the fabric reflectors especially made for this purpose. You want to position it as far away from the person as you can while still adding enough light. The 3rd light is the backlight. It’s purpose is the set the subject apart from the background. For a learning exercise you might want to start with a person wearing dark clothing sitting in front of a dark wall. The backlight goes on the same side as the key light, unless you can hang it from above. It does not go directly overhead of the subject! Move it back at least 2 feet, so that it’s aimed at an angle a little above the nape of their neck. Try to highlight the top of the person’s head and their shoulders with the light. A beginning rule of thumb is that the fill light and the backlight are 1/2 the wattage of the key light. Less light is better. After you’ve set your lights, turn off the room lights, so that you are only using your lights. Now look thru the viewfinder at your shot. Are you shooting the dark side of the subject’s face? Good. Do you see two eyes? If not, move the camera to the left or right or turn the subject’s chair until you see two eyes. You can also move the interviewer’s chair closer to the lens. Are any strange shadows from their nose or ears falling in the shot? If so, you’ll have to move the light that’s causing it.
Now you just zoom in as tightly as you can on the person’s eyes and let the camera set the focus. Then take it out of auto and zoom out to frame your shot. Your background should be slightly out of focus and there should be just a little halo of light behind the person – a little halo!
What do you do if you don’t have any lights? Shoot in the dark – no just kidding! You’ll have to be creative. First off, where is the available light coming from? Is there a window? A lamp? Or, is it the dreaded overhead fluorescents? If you’ve got a window, you should be fine for the amount of light. Daylight is very bright. Just make the daylight the keylight and don’t worry about trying to add a backlight. If you’ve got a lamp for the only light source, the best thing to do is to face your subject into the light, put your interviewer across from them and shoot the darker side of their face. If you only have overhead fluorescents, just do the best you can. It wont be arty, but it will be seen.*
*The color of light is measured as temperature in degrees of Kelvin, which translates into colors. Daylight is about 5400¡ or higher and is blue. Light from an incandescent light bulb, called Tungsten, is about 3200¡ and it’s color is orange-reddish. Fluorescent lights are about 4200¡ and are green, though very modern fluorescent lights can now be either daylight or tungsten. This is referred to as the White Balance. Because of the different temperatures and therefore the different colors, you must set your camera to match the light source, otherwise your indoor footage might look blue, or your outdoor footage could look red if the white balance is set incorrectly. All cameras have a menu for WB, on the inexpensive DV camcorders they often just show a small picture of a sun or a light bulb and a third position for auto or auto tracing. Most cameras also have a manual set, which is the best way to get it right. To manually set the white balance, hold a white card or piece of paper with the light shining on it. Zoom in so that the white fills the screen, then press the white balance set button until you see the indicator marks it as set. Try not to use auto mode, instead select either the indoor or outdoor setting to match your light source, if you cannot white balance manually.
You’re now ready to go out and shoot your first video. By keeping in mind these rules, tips, and tricks, I hope you will avoid many of the mistakes that beginners often make. As you shoot and then edit your videos, you will get better and better and discover many more ways to make your videos interesting, informative, exciting, and even original. Good luck!
![]()
Copyright © 2002 South Coast Productions