One question that new users often ask is how to do motion control or recreate the so-called Ken Burns effect that they enjoy in iMovie. Though not as simple as in iMovie, it’s relatively easy to do in Final Cut Express. Accompanying this article is a zipped file called MotionControl.zip containing an FCE project together with a couple of still images.
To do the exercise, begin by copying the Stuffit file to your computer and opening it up. Then double click on the project file KenBurns to launch the application. The project contains two sequences, Sequence 1, which is empty and Finished Sequence, which will show you where we’re going. The Browser also has two still images LongShot.JPG and Leaves.JPG.
Start by dragging the two still images into Sequence 1, which should be open. The images are 1500x1125 pixels in size, much larger than the size of the regular DV frame, which is 720x480 pixels. Whenever you bring a still image into an FCE sequence, the application will always try to fit the image to the sequence size as best it can. If the image is tall and narrow, a vertical shot, the application will scale it so it fits vertically in the frame. In this case the images are scaled down to 48% to fit into the Canvas. You can see this by double clicking one of the images to open it into the Viewer and looking at the Scale value in the Motion tab. To create the Ken Burns effect we’re going to want to animate this Scale value. To do this make sure the playhead in the Timeline is at the start.
1. Make the Timeline active (Command-3) and hit the Home key.
2. Set the Canvas to Image+Wireframe (W).
3. Select the first clip in the Timeline. The white cross should appear in the Canvas (Figure 1).
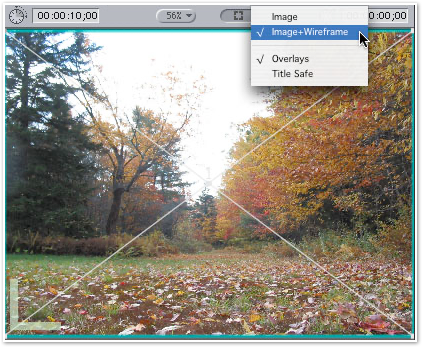
Figure 1: Image+Wireframe