Multicam3
Editing the Multicam Clip
The next thing you want to do, after you’ve made your multicam clip, and prepared it in the Angle Editor, is to edit it into the project. It can be marked for a selection in the Event Browser like any other clip and edited into a project. You can mark up a multicam clip with In and Out points to make a selection to trim off the beginning and end as you need and then press W to Insert, E to Append, or even D to Overwrite into your storyline.
Once the multicam clip is in the project the Angle Viewer can be used to cut or switch between angles. The Angle Viewer does not cut/switch in the Angle Editor, only for a project clip.
Open the Angle Viewer with Shift-Command-7 or from the Window menu or from the View popup in the upper right of the Viewer.
The default display for the Angle Viewer is to show a four-up display, but you can change this in the switch popup in the upper right of the Angle Viewer, everything from 2 Angles to a 16 Angles display.
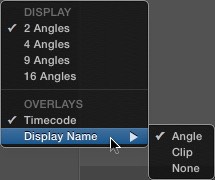
Angle Display
Notice in this popup you can also turn on overlays like Timecode and Names.
At the bottom of the Angle Viewer you may see icons that look like this:
![]()
Page Icons
Because you can only see up to 16 angles at a time, but can combine 64 clips into a multicam clip, this icons give you access to the additional pages of angles you can have in the clip. Just click on the page you want to see the angles on that page.
One nice feature is that if you have a four-up or two-up display you can stack them vertically so the Angle Viewer takes less horizontal screen space.
![]()
Vertical Angle Viewer
The clip name that appears in the Timeline is made up of the name of the active video and audio angles. If both are the same you’ll see the video clip name.
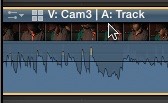
Timeline Clip Name
With the multicam clip edited into the project, the Angle Viewer gives you three cutting/switching options at the top.
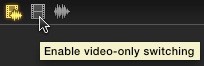
Cutting/Switching Options
The default cuts and switches video and audio together. When you select an angle, it will be highlighted in yellow. The second option enables video only. When you select an angle, it will be highlighted in blue and whatever audio is active will remain in green. Those who used legacy versions of FCP will remember this as the display was very similar. Finally, if you choose the waveform icon you will be cutting/switching audio only. An angle selection you make will be highlighted in green. You can change these options with keyboard shortcuts. Shift-Option-1 will select video/audio switching; Shift-Option-2 will select video only switching; and Shift-Option-3 will select audio only switching.
The default behavior for the multicam clip is to cut the clip wherever the playhead is. If you only want to switch an angle hold the Option key. For example, after you’ve edited your music video with its music track into your project, hold to Option key and click on the music, which will make it the active angle. Next set the cut/switch icon to Video Only. Finally, again holding the Option key, select the video clip that you want to be active angle to start the edit. Now you’re ready to edit your multicam clip in the Timeline.
To edit the clip start playing your Timeline, and as you play back click on the angle you want to cut to the multicam clip. With video only selected you’ll cut just the video and the previously selected audio active angle will play back.
Another great way to cut your multicam clip is by using numbers, either across the top of your keyboard or the numbers on the keypad of an extended keyboard. Tapping a number will cut to that angle number. (Option-tapping a number will switch to that angle.)
After you’ve made your cuts you’ll notice that the cuts in the multicam clip display a little differently in the Timeline.

Cut Differences
On the left you can see the normal cut and on the right the cut in the multicam clip. Notice the black dotted line on the video portion of the edit. This indicates that the video has been cut. The white dotted line on the audio portion indicates the audio is a through edit and is uncut. If the line is dotted black all the way down, then both the video and audio have been cut at the edit point. (In 10.3 there is no color differentiation with black and white dotted lines; all the cut lines in the multicam are back dotted lones.)
You can add any transition to the edit point. Just be careful you have sufficient media for the overlap or the multicam clip can be pulled out of sync. FCP calls an cut in a multicam clip a through edit, because the multicam clip is continuous. Any through edit can simply be selected and deleted with the Delete key. The left side of the multicam clip will roll over the right side erasing it.
The other difference with these edits is that FCP doesn’t allow you to use a ripple function next to edits as this would pull the material out of sync. You only have the roll edit function available. The slip function can be activated using the trim tool but it should not be used, because, again, this tool will slip the multicam clip out of sync. The slide function can be used as this rolls two edit points at the same time.
Playing back a large multicam clip can be a problem for even high-powered systems. If you have problems with playback, dropped frames for instance, the best solution is to transcode your media to proxy files. Make sure your hard drive system is fast enough to support multiple streams of video and audio. Optimized and proxy files will work much better.
The simplest way to convert your media is to select the multicam clip in the Event Browser, right-click on it and select Transcode Media. The application will transcode all the clips built into the multicam clip into proxy and/or optimized as selected. Remember if you’re working with proxy files that you have to switch your playback preference to proxy and when you’re done don’t forget to switch it back to original/optimized for output.
Once you’ve edited your multicam clip in the Timeline, you might want to change a shot to a different angle. You can do that by holding the Option key, as we did above, before clicking on the angle you want in the Angle Viewer. You can also right-click on the shot and from the shortcut menu select the angle you want, switching either the video or the audio.
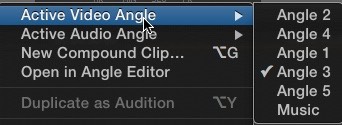
Selecting Active Angle
You can also change the active video and audio angles in the Info tab of the Inspector.
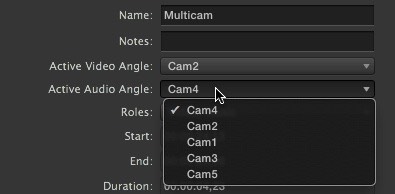
Active Angles in the Inspector
The shortcut menu also allows you to open the multicam clip in the Angle Editor. This allows you to do color correct and add effects there.
Once you’ve finished editing the multicam clip in your project, don’t forget to close the Angle Viewer as this will greatly improve playback performance in the Timeline.
That’s it for our look at working with FCP’s multicam feature and some of the tools incorporated into it. If you have any questions, I will try to answer them as best I can.
Copyright © 2013 South Coast Productions